

Geocoder |

|

|

|

|

|
||
Geocoder |
|
|
|
|

|

|
Geocoder |
|
|
|
|
|
||
Geocoder |
|
|
|
|
|
|
|
|
||
Start Geocoder from Main Menu: Start Tools>Geocoder
The Geocoder processes your address file and determines latitude-longitude for each address. A marker file is created that includes a record for each address geocoded. The latitude-longitude values are included in the marker record enabling Google maps to display the markers on a Google Map.
Google geocoding terms of service sets the maximum geocodes per day is 2500. After this number, Geocoder will not operate unless the user has a Google geocoding account. Repeated attempts to geocode more than 2500 addresses per day may result in your IP being blocked from any geocoding.
Geocoder Form Structure
The Geocoder form is organized as two panels. The left panel contains controls. The right panel is the data grid.
Left Panel - Controls
At the top of the left panel are the Grid import/export buttons.
•XLS2Grid - import an Excel file into the grid.
•CSV2Grid - import a CSV file into the grid.
•Grid2XLS - export grid cells to an Excel file.
Right Panel - Data Grid
The Grid is comprised of row and column cells.
Rows and columns follow "zero-based" numbering. The first row is numbered 0 and so on.
For geocoding, a row in the Grid normally corresponds to an address record or row.
Any cell in the grid can be directly edited.
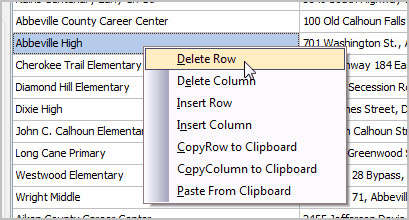
Grid controls are available by right-clicking a cell in the grid.
Rows and columns can be deleted, inserted and copied and inserted.
First, left-click a cell to identify/select the row and column of interest.
Then right-click that cell and the popup control panel appears:
Geocoding Steps
•Develop the address file in Excel. This is not required but will typically be the easiest method.
•Use XLS2Grid to import the Excel address file into the Grid.
•Set AddCols (address column) to be used for geocoding.
•Set NameCol (name column) for the column to be used as name in the marker CSV file.
•Set StartRow and EndRow for the addresses(rows) to be geocoded.
•Click Marker to select marker style: saved in the marker CSV file and displayed in map viewing.
•Set the ZoomLev (zoom level): saved in marker CSV file
•Set SaveAs path and name of the marker file to be created.
•Click the Start Geocoder button.
The message "Done" appears when the coding is complete.
Close the form.
On the main form, use Markers>Load markers from CSV file. Select the file name used in the SaveAs edit box in the Geocoder form (the default is c:\gmaps\gmaps.csv).
Markers display on the Google Map view.
(review above details to learn more about using operations shown below)
The following application shows how addresses in an existing Excel file can be geocoded, a marker file created, the markers/marker file viewed with Google Maps and additional information/geospatial analysis ... all provided through GMaps.
Start Tools>Geocoder (see details above)
Click XLS2Grid -- open/import the addresses XLS file -- c:\gmaps\addresses20091.xls (included with installer).
Imagine that this is your own address file. The addresses could be students, schools, sales, suppliers, clients, donors, businesses, survey respondents, etc. The source file, geocoding process and markers file stays on your computer under your control. As an educator, suppose there are 2,000 students in your school; you already have the student addresses. Students can be geocoded by grade or other attribute. What are performance patterns by neighborhood?
Data used in this example. The file c:\gmaps\addresses20091.xls contains addresses in Overland Park, KS (Kansas City metro). The addresses are in ZIP codes 66210, 66212 and 66213. See location of ZIPs in view below. The addresses are realistic but not really known persons or entities in this example.

This is actually a three part example. You can emulate these steps. The same base file is used (c:\gmaps\addresses20091.xls) but Geocoder is run three times, each for a different set of addresses, different markers, generating three marker files:
•rows 5 thru 20; icon60.png; saved as c:\gmaps\gmaps0911.csv
•rows 1090 thru 1105; icon48.png; saved as c:\gmaps\gmaps0912.csv
•rows 2235 thru 2250; icon56.png; saved as c:\gmaps\gmaps0913.csv
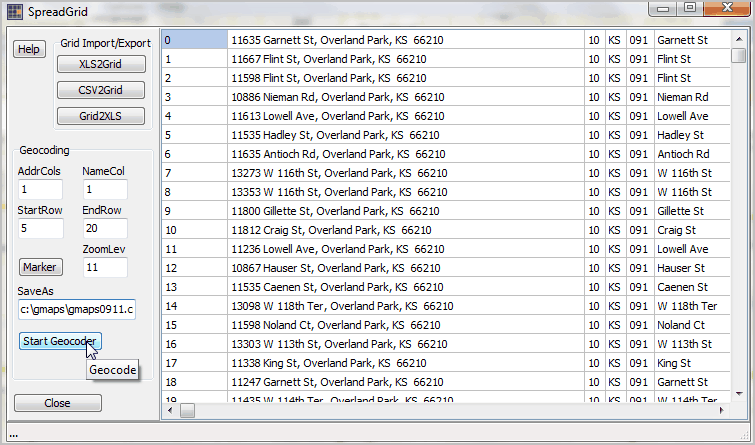
Here are the steps to develop c:\gmaps\gmaps0911.csv.
•AddrCols: 1
•NameCol: 1
•StartRow: 5
•EndRow: 20
•Marker: icon60.png
•ZoomLev: 11
•SaveAs: c:\gmaps\gmaps0911.csv (any existing file will be overwritten).
•Click StartGeocoder
At end of geocoding, message "Done" appears.
Close the Geocoder form.
From the main GMaps form, select Markers>Load markers from .CSV file:
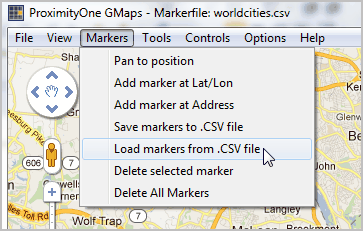
when prompted, select the name of the file created by Geocoder (c:\gmaps\gmaps.csv).
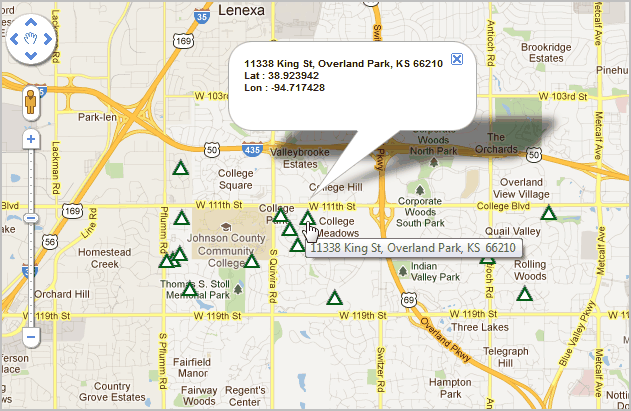
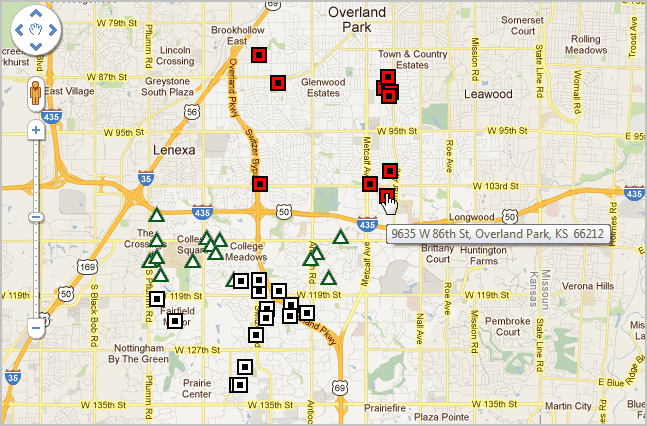
The locations of the three geocoded addresses appears:
The Geocoder is run three times, creating the separate files. These files are then combined into one marker file c:\gmaps\gmaps091.csv:
Learn about merging separate marker files at Markers>Merge Marker Files. This same example is reviewed in that section.
