|
|
|
School District Demographics dBMerge Main Page |
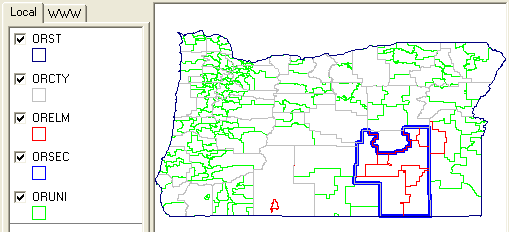
Integrating School District Geographic and Subject Matter Data 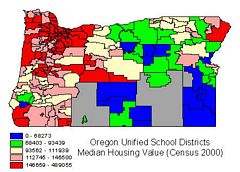 This section provides a tutorial on creating school district maps
similar to the one shown at the right for your areas of interest.
Steps outlined make use of the Proximity dBMerge software that enables
integration of geographic/map files (shapefiles) and subject matter files.
This section provides a tutorial on creating school district maps
similar to the one shown at the right for your areas of interest.
Steps outlined make use of the Proximity dBMerge software that enables
integration of geographic/map files (shapefiles) and subject matter files.
Census 2000 School District Demographic Thematic Maps. The present scope of this section shows how to create the thematic maps using the Census 2000 school district boundary files and the Census 2000 school district demographic profile datasets developed by Proximity. In summary, the process involves these steps:
1 - Mapping Software. You will use mapping software to view the data in the form of thematic or reference maps. If you do not have mapping software use the no fee ArcExplorer software. (download ArcExplorer here and install). 2 - Acquire Map Files. This application makes use of freely downloadable map files available via the Census mapfile download server. Even though the focus is on school districts, most users will want to examine these data in the context of other geographic areas. From the above link, download and expand these mapfiles (in shapefile format) from the Census server link (above): County and County Equivalent Areas: 2000 Oregon School Districts - Elementary: 2000 Oregon School Districts - Secondary: 2000 Oregon School Districts - Unified: 2000 Oregon State and State Equivalent Areas: 2000 Oregon In the applications that follow, the state of Oregon is used as an example (and making use of FIPS state code 41 and USPS state abbreviation OR). Note that the state that you are mapping might not include elementary nor secondary school districts. Expand the map files to the folder c:\maps. For ease of reference, rename the expanded files in this manner: c:\maps>copy co41_d00.* orcty.* c:\maps>copy se41_d00.* orelm.* c:\maps>copy ss41_d00.* orsec.* c:\maps>copy sn41_d00.* oruni.* c:\maps>copy st41_d00.* orst.* These files should now exist in the c:\maps folder: orcty.dbf, orcty.shp, orcty.shx orelm.dbf, orelm.shp, orelm.shx orsec.dbf, orsec.shp, orsec.shx oruni.dbf, oruni.shp, oruni.shx orst.dbf, orst.shp, orst.shx 3 - Acquire Demographic Data Files. Typically map files (shapefiles) do not include subject matter data. This is true of the map files downloaded from the Census server. Demographic data files must be acquired separately and the associated with the maps files. In this application, the Proximity demographic profile data are used. See U.S. by School District GeoDemographic Profile Database for a more detailed description of these data. The demographic profile datasets have been structured as four files so that they correspond to files and naming conventions used by the Census Bureau for other types of geographic areas (Census nor any other agency has developed the demographic profile summaries for school districts). The procedure described here can be applied to any of the four file types. The Housing Characteristics file (DP4) file is used in this example. See http://proximityone.com/dp4.htm for a description of the subject matter items (and corresponding field names) included in the DP4 file. Download Oregon School District Demographic Profile File 4. Expand this zip file into c:\maps creating the file c:\maps\orsddp4.dbf. 4 - Use dBMerge to Integrate Geographic and Demographic Data. Use the Proximity dBMerge software to integrate the demographic subject matter data into the shapefile dbf. Download the dBMerge zip file and expand to c:\dbmerge. Start dBMerge and start the Integrate>Merge operation. You will now run this panel three times, integrating the demographic data into the respective shapefile dbf. When then Merge screen appears, select (the default selections): Source File 1: c:\maps\orelm.dbf Source File 2: c:\maps\orsddp4.dbf Output File: c:\maps\elm.dbf Next, click the Create button (at right). The screen should then appear as follows: 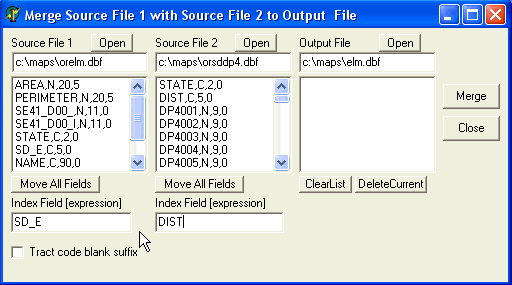
Now need to perform these steps:
When the merge is complete the completed processing screen appears as shown below. Note that the Census version of the Oregon elementary districts file has an error -- there is no 11th polygon as partly represented in the shapefile. When a notification message appears in dBMerge about the missing information, press enter and continue. Also, the demographic data file does not contain data for the pseudo school district 99997. When you receive the warning message, press enter and continue. The 99997 polygon is loaded with all zeroes in the data fields. 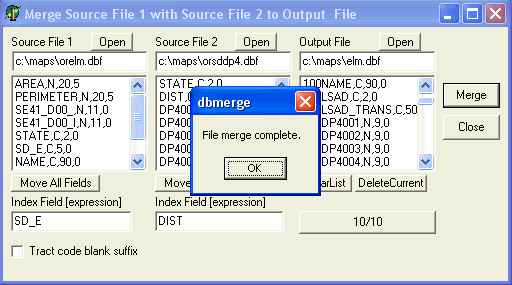
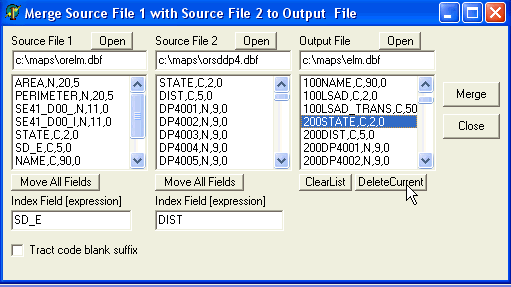
Now repeat the same process that you just performed for elementary districts for secondary and unified districts. For these two operations, source file 1 will be orsec.dbf (oruni.dbf), the index field will be SD_S (SD_U) and the output file sec.dbf (uni.dbf). Use full path specification for files and do not forget to delete the fields STATE and DIST (see above). The three files generated are now used to overwrite and replace the original version of the school district shapefile dbfs. These commands can be used to perform this task: c:\maps>copy elm.dbf orelm.dbf /y c:\maps>copy sec.dbf orsec.dbf /y c:\maps>copy uni.dbf oruni.dbf /y At this point the demographic and geographic data files have been integrated. 5 - Mapping Applications -- Using the Map Files with Integrated Demographics. The map files developed above will now be used with the ArcExplorer freeware. The same files can be used with the for fee ArcView. Download ArcExplorer and install on your computer. Start ArcExplorer Start>Program Files>ESRI>ArcEexplorer2 (for more information on using AE2, go to http://www.esri.com and search arcexplorer2)
Select the unified districts theme and change the properties so that the subject matter item DP4065 (median housing value) is used to display a class interval (thematic) map. The map appears as shown below. The demographic data added to the shapefile dbf can is now viewed as a thematic map. 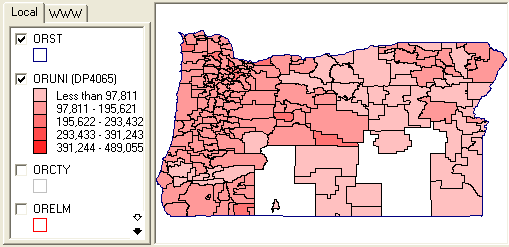
Select the information tool and click on the school district depicted in the map presented below. A profile of the data record for this area appears as shown. The Census 2000 median household income for this school district is estimated to be $266,500. 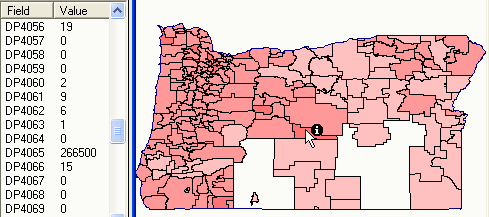
[goto top] |
|