|
Using CV Projects |
  
|
|
Using CV Projects |
|
The Proximity CommunityViewer (CV) software is used with associated project fileset to examine/analyze geodemographic-economic patterns and trends. The guide provides many examples and instruction on analysis of state geodemographics that may be used by users of CV with the project fileset.
Installing CV and CV Projects
Step 1. Install CV on your Win32/64 computer using instructions provided separately.
The basic project containing most files used to develop this document is named ms1.gpr. The ms1.gpr and related files must be placed on your Win32/64 computer to emulate views presented in this document and create your own variations and integrate other data. The ms1.gpr and related files have been placed in a zip file ms1.zip.
Step 2. After completing CV installation, expand the ms1.zip file, using instructions provided separately, to the folder c:\cv\msfiles\. It is important that the zip file be expanded to this folder. Later, the files may be placed in any folder. In general, CV has no particular folder name dependencies. The naming is used in this special case so that your applications/operations initially match those used in the development of this document.
Step 3. With CV running, open the file (File>Open) c:\cv\msfiles\ms1.gpr.
When the project file is opened, the view should appear as shown in the following graphic. If this view does not appear, the ms1 project fileset has not been expanded into the c:\cv\msfiles folder.
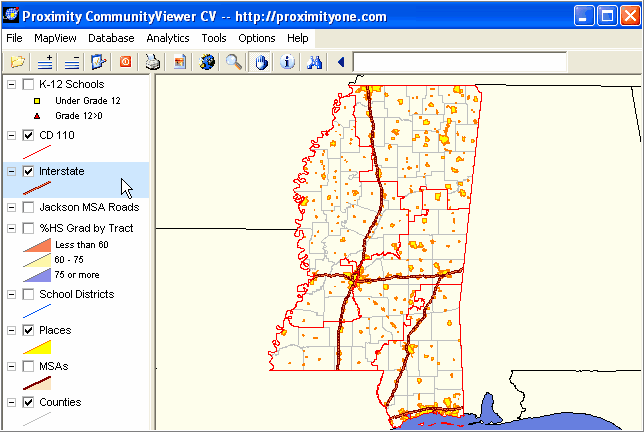
Layers depicted in the legend panel at left shown what types of geographic objects are active and represented in the map view panel. Each layer is based on a shapefile. Shapefiles used in the project are described in the Data Resources section.
Refer to the CV User Guide (access from CV main menu Help section) for additional information.
Page url: http://proximityone.com/commdev/guide/index.html?using_cv_projects.htm